Summery Olive Oil Lemon Rosemary Bundt Cake

Summer is my favorite time of the year! You get to have cold drinks, eat ice cream, go to the pool, be outdoors, and enjoy barbeques with the family.

They say is “beach” season but that doesn’t mean you have to starve yourself. You can indulge at least once a week… at least that’s what I do. But don’t listen to me because I know nothing and eating sweets is priority number one on my agenda, haha

the baking cup olive oil lemon rosemary bundt cake 4

Speaking of summer, we just moved to Las Vegas and it’s nice and toasty ;) I like the heat but I’m not going to lie, I’m still adjusting to the sunny weather. We’re finally settling in and getting to know the city, other than the strip. Locals don’t go there all the time so we’re learning fun things to do that don’t include $15 drinks ;)

The good thing about moving though is that I get to try a new kitchen and new natural light for the pictures. I’m still trying to figure out the best time and place within our home, which is always exciting but challenging!

the baking cup olive oil lemon rosemary bundt cake
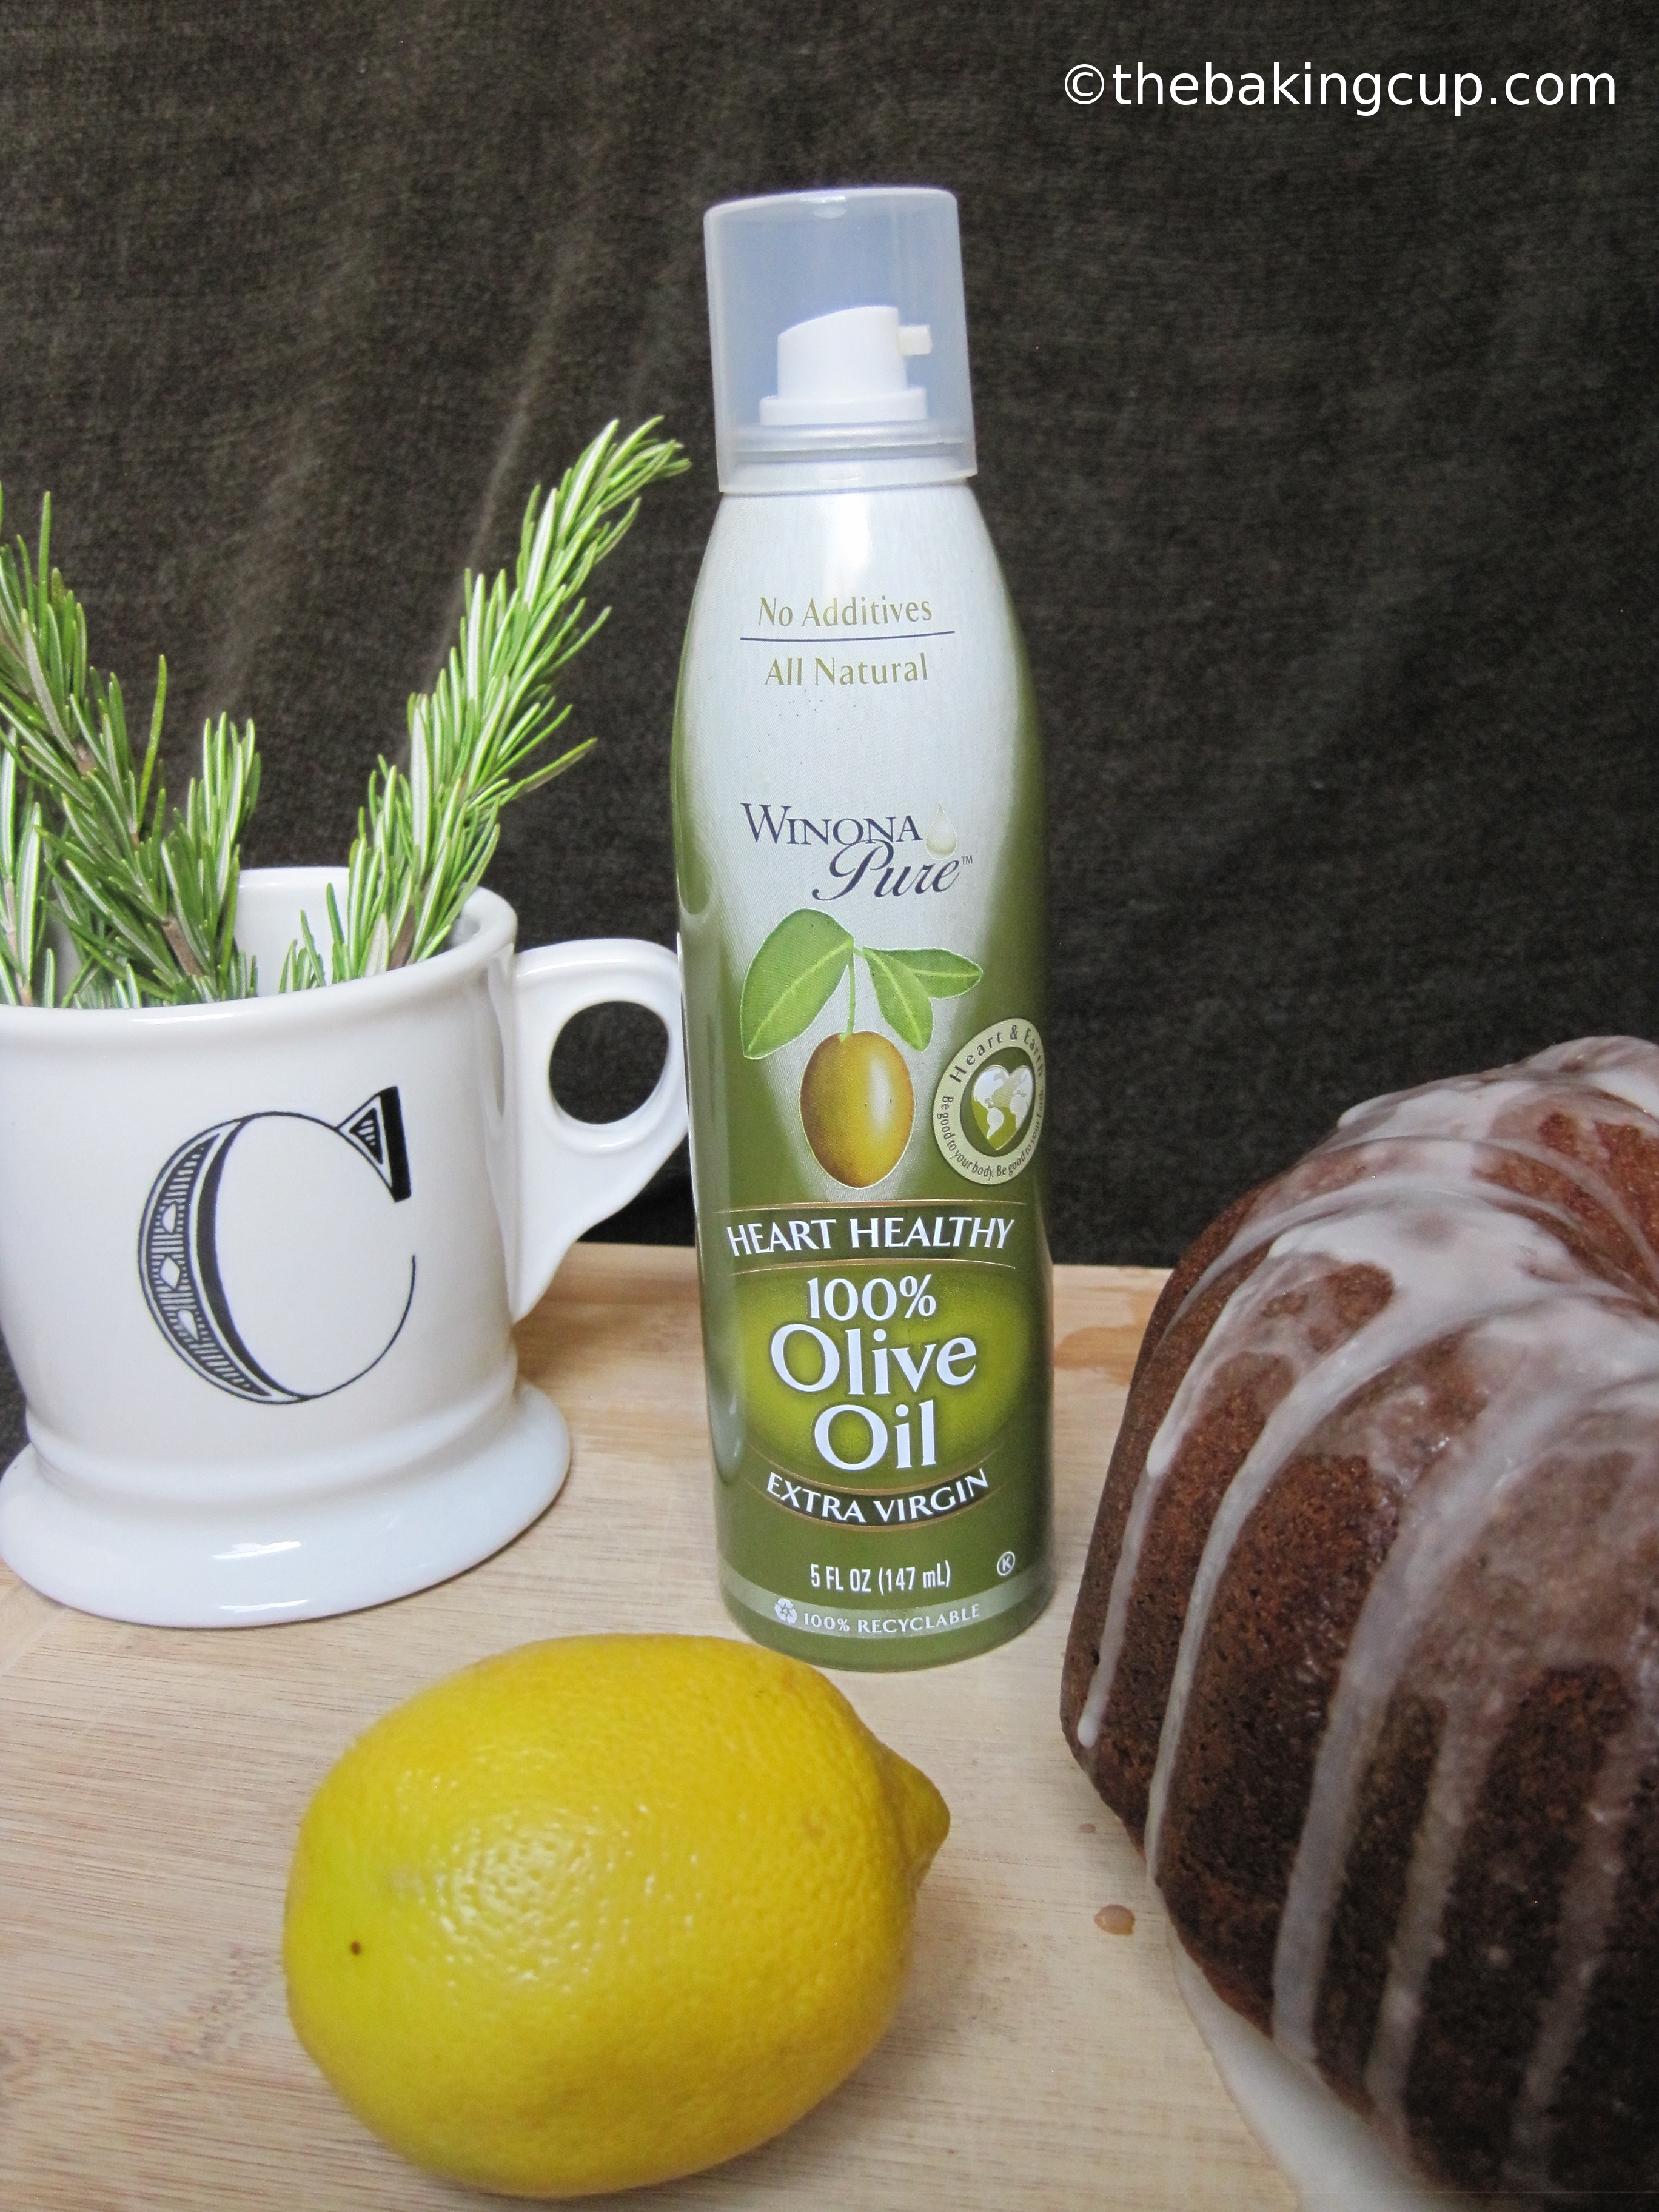
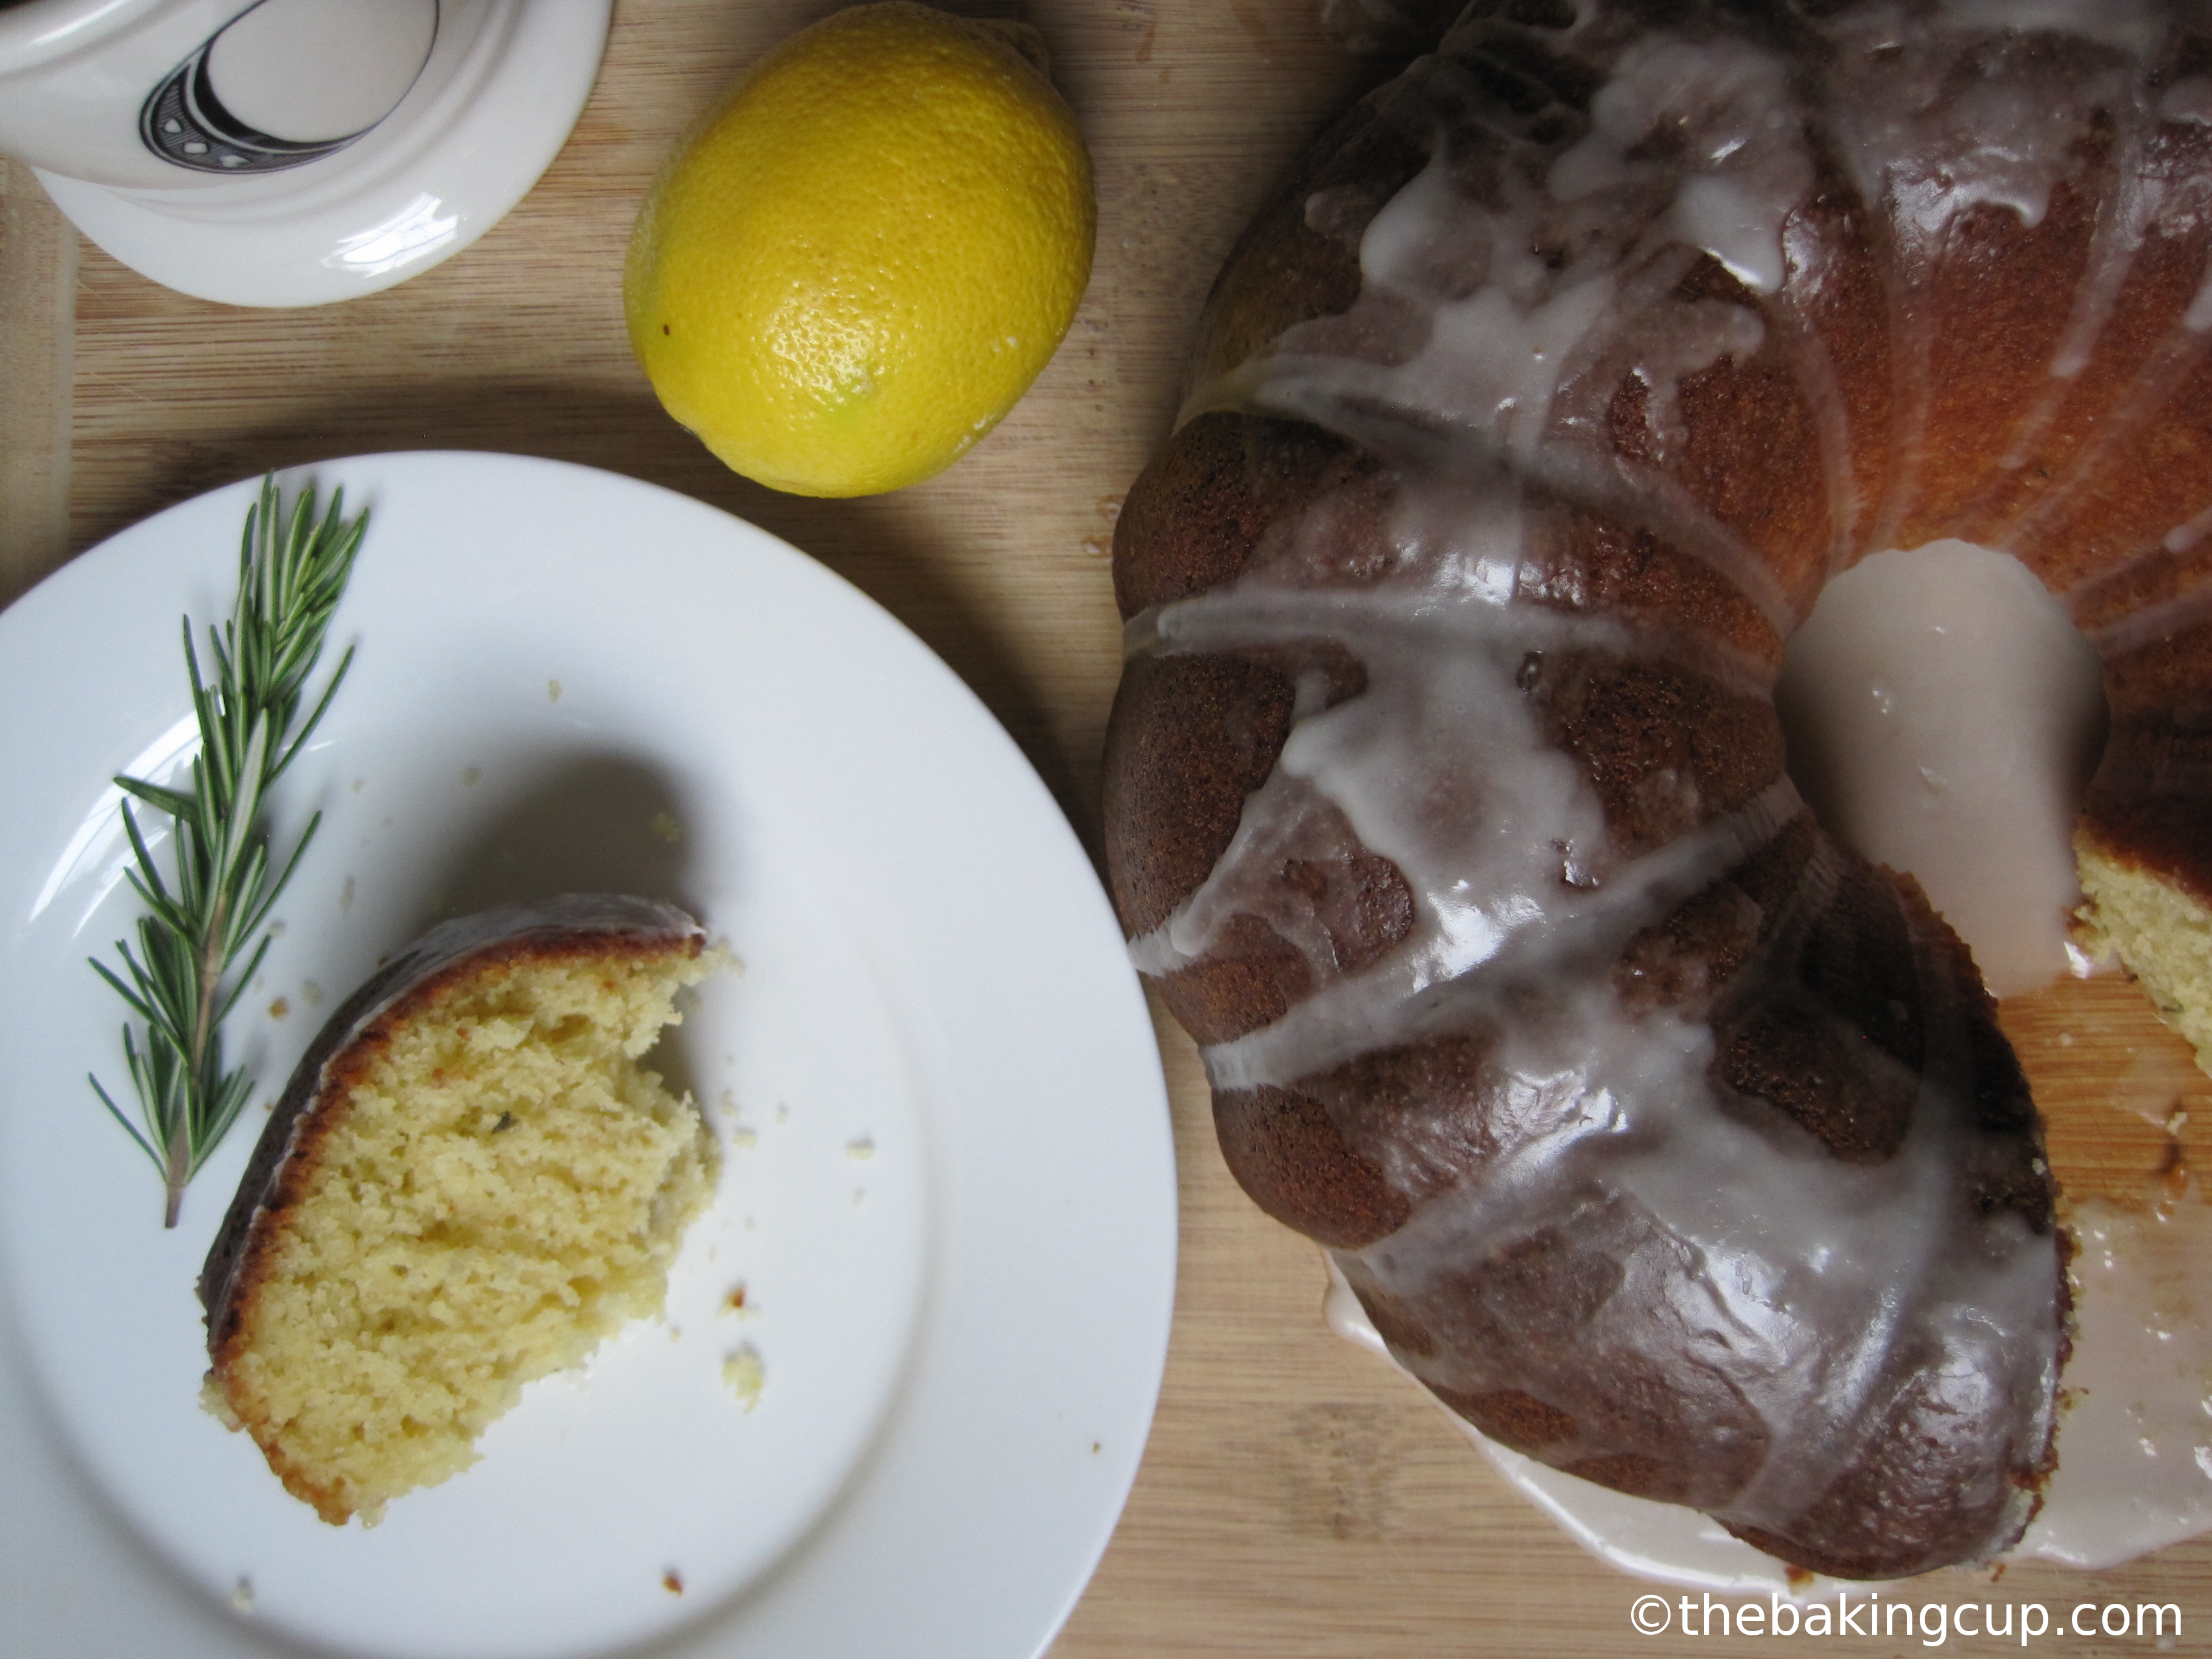
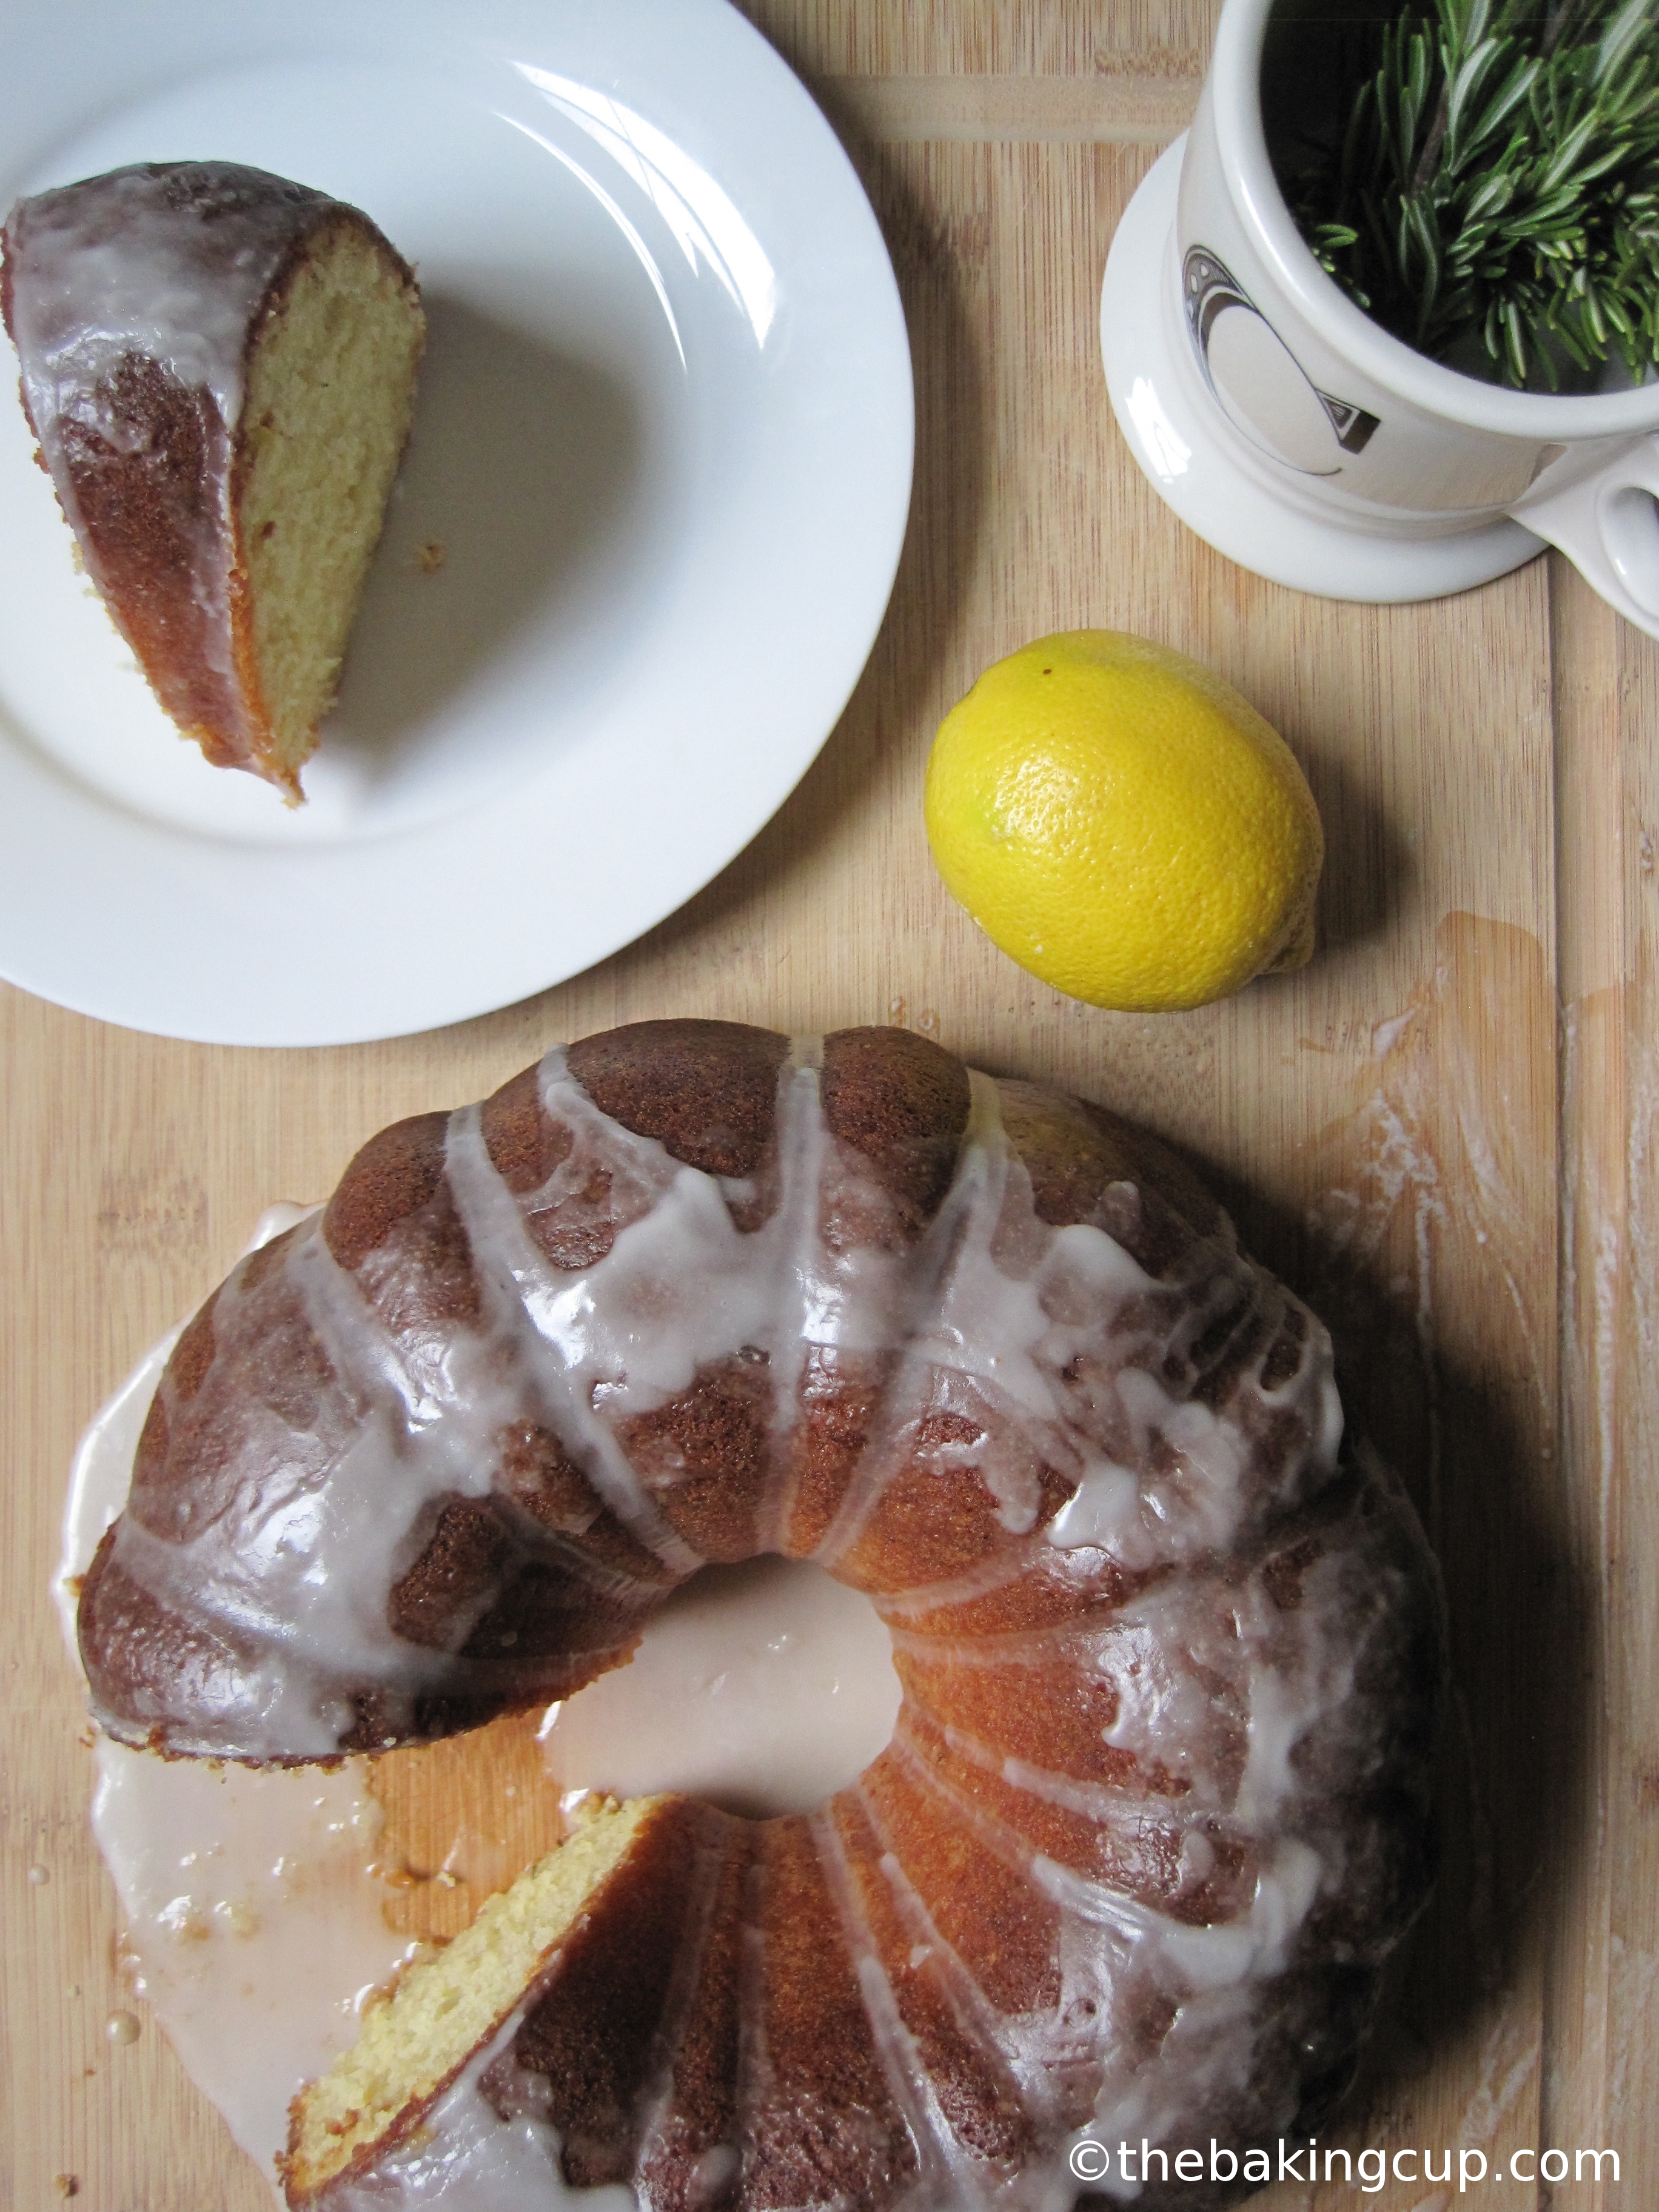
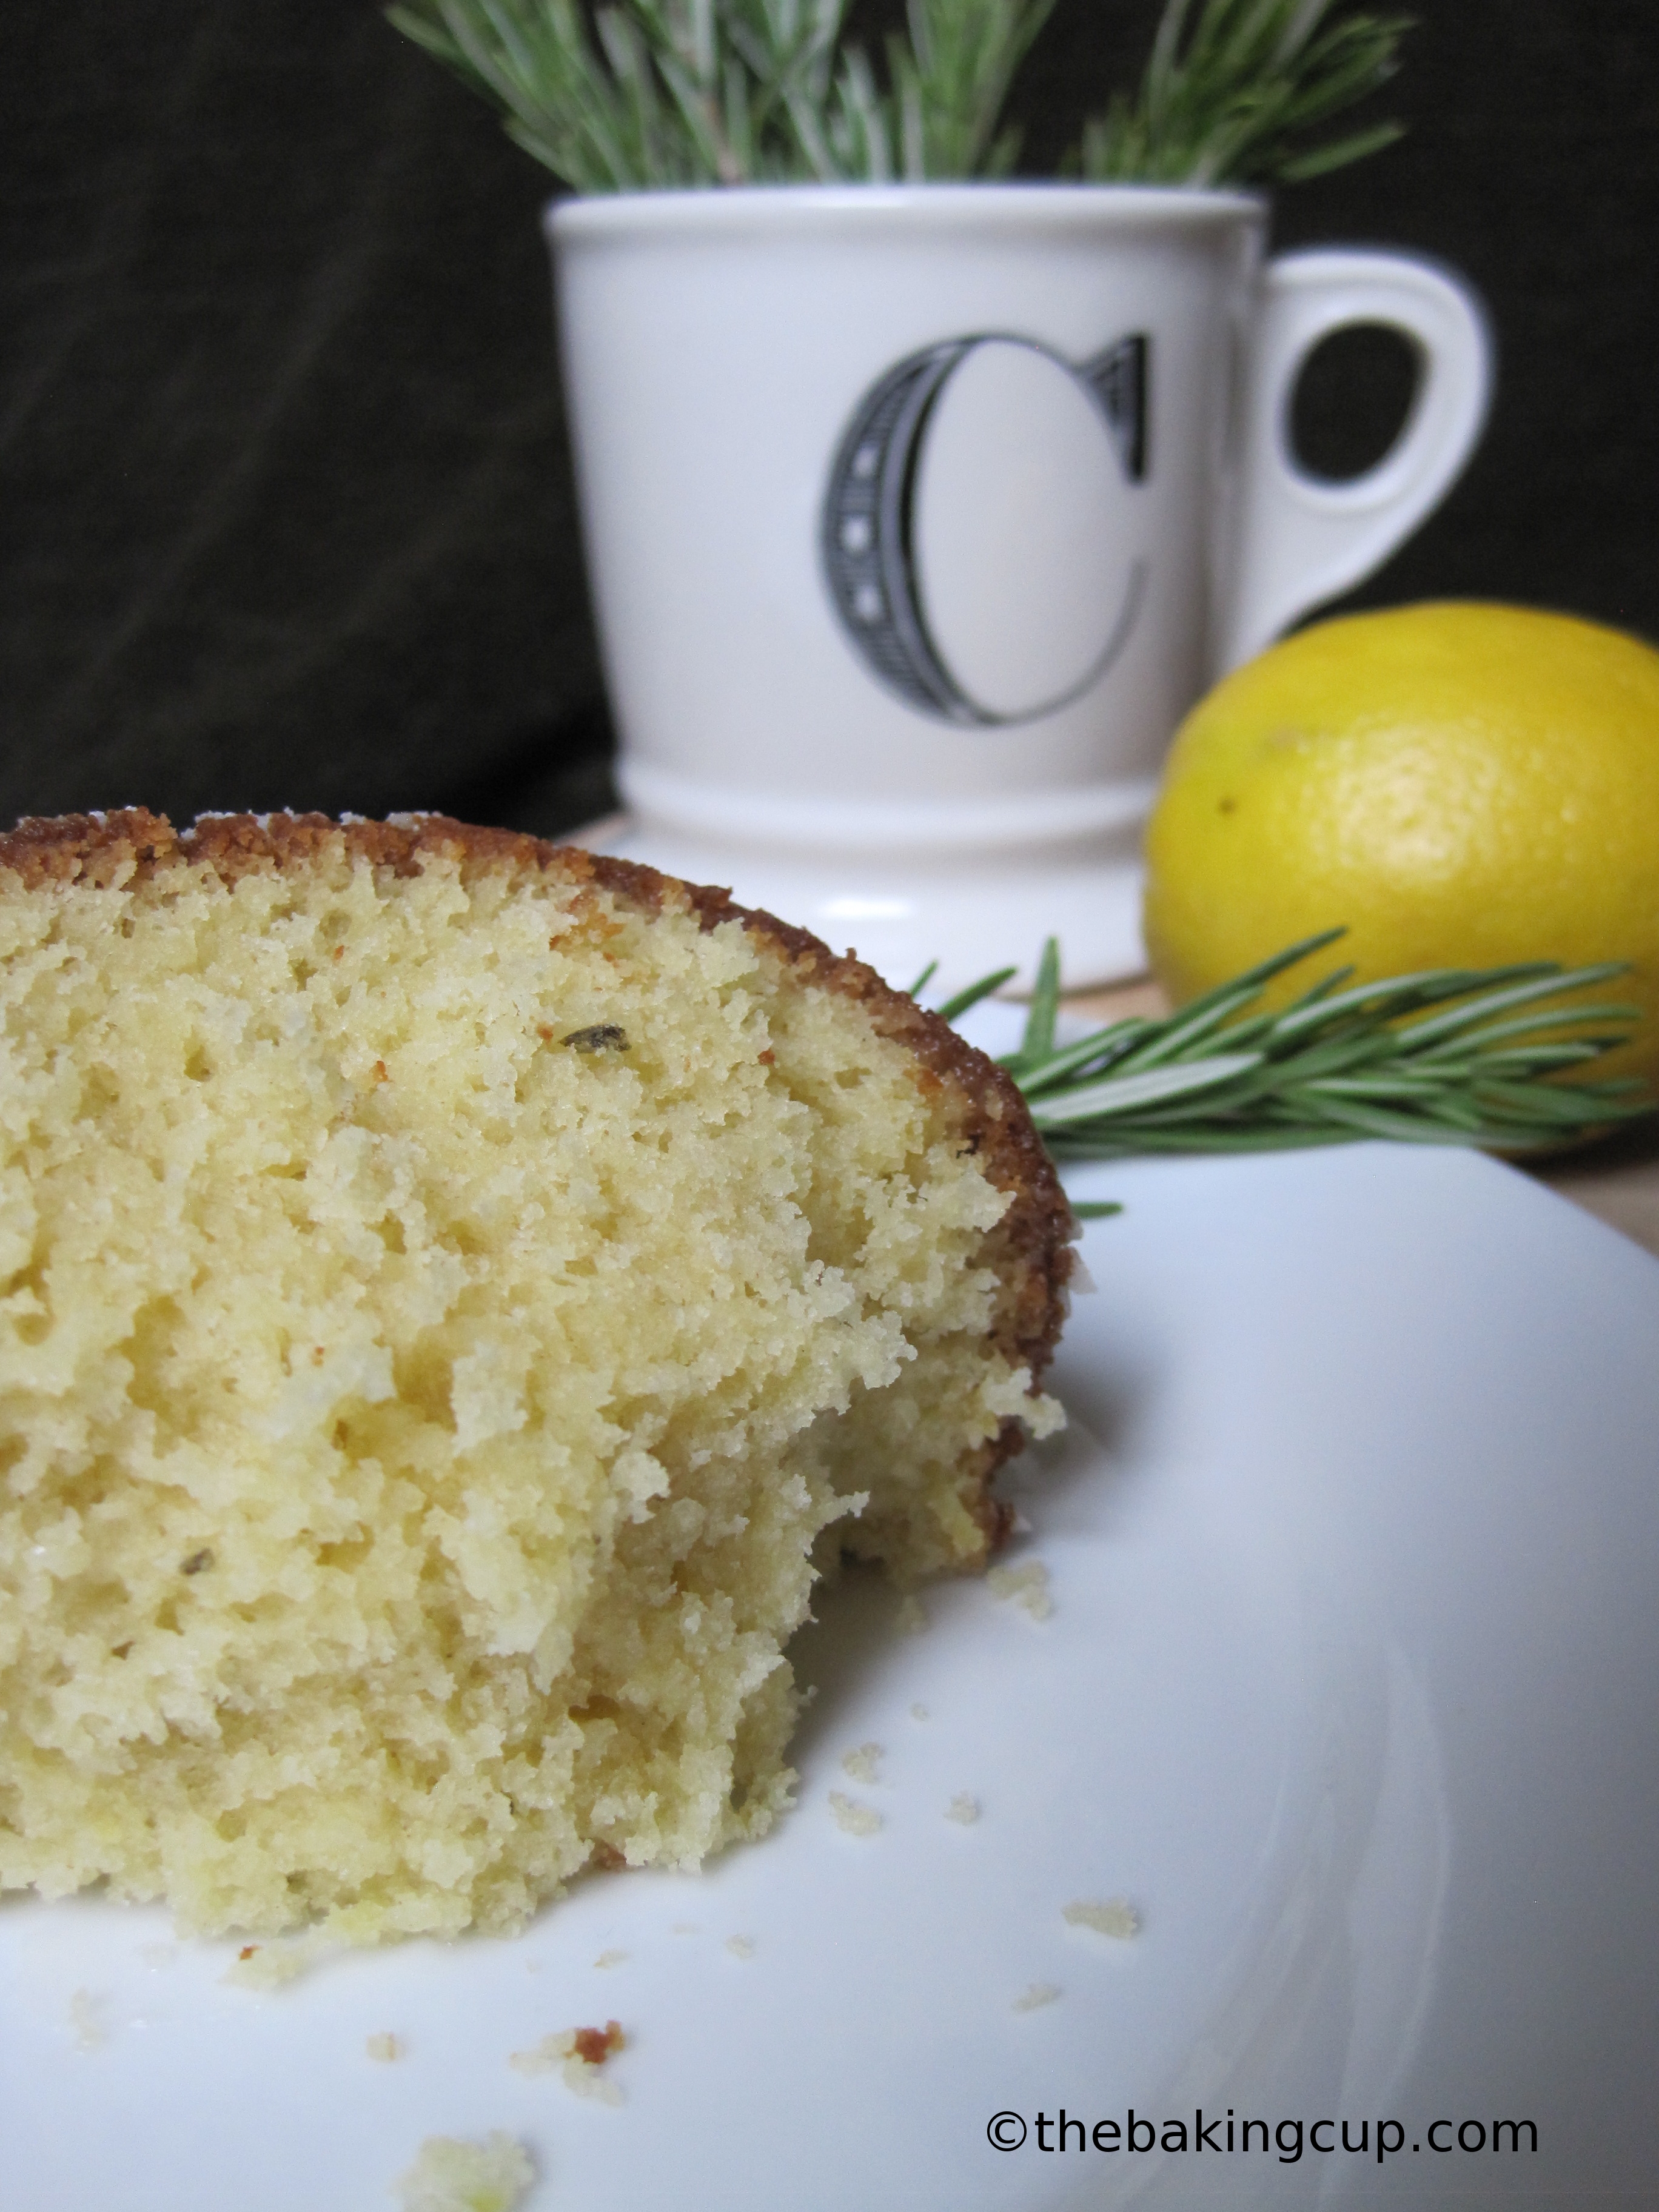
Since I love summer, I thought of starting the season with this olive oil lemon rosemary bundt cake. It’s sweet and tangy, and very fragrant because of the rosemary. It’s light and perfect for anytime of the day! Even for breakfast!!

One of the things I care about the most are the ingredients I bake with. Sounds cliche but it’s true. If you have quality ingredients, you’ll have better results (this is 100% true and you can definitely taste the difference). So when Winona Pure Oils contacted me to team up, I was super excited to develop a recipe with their oils in mind. Their oils are all natural, and while you do an eye roll, I tell you that they don’t use chemicals or propellants in their spray oils. Check them out, I’m sure you’ll love them.

the baking cup olive oil lemon rosemary bundt cake2
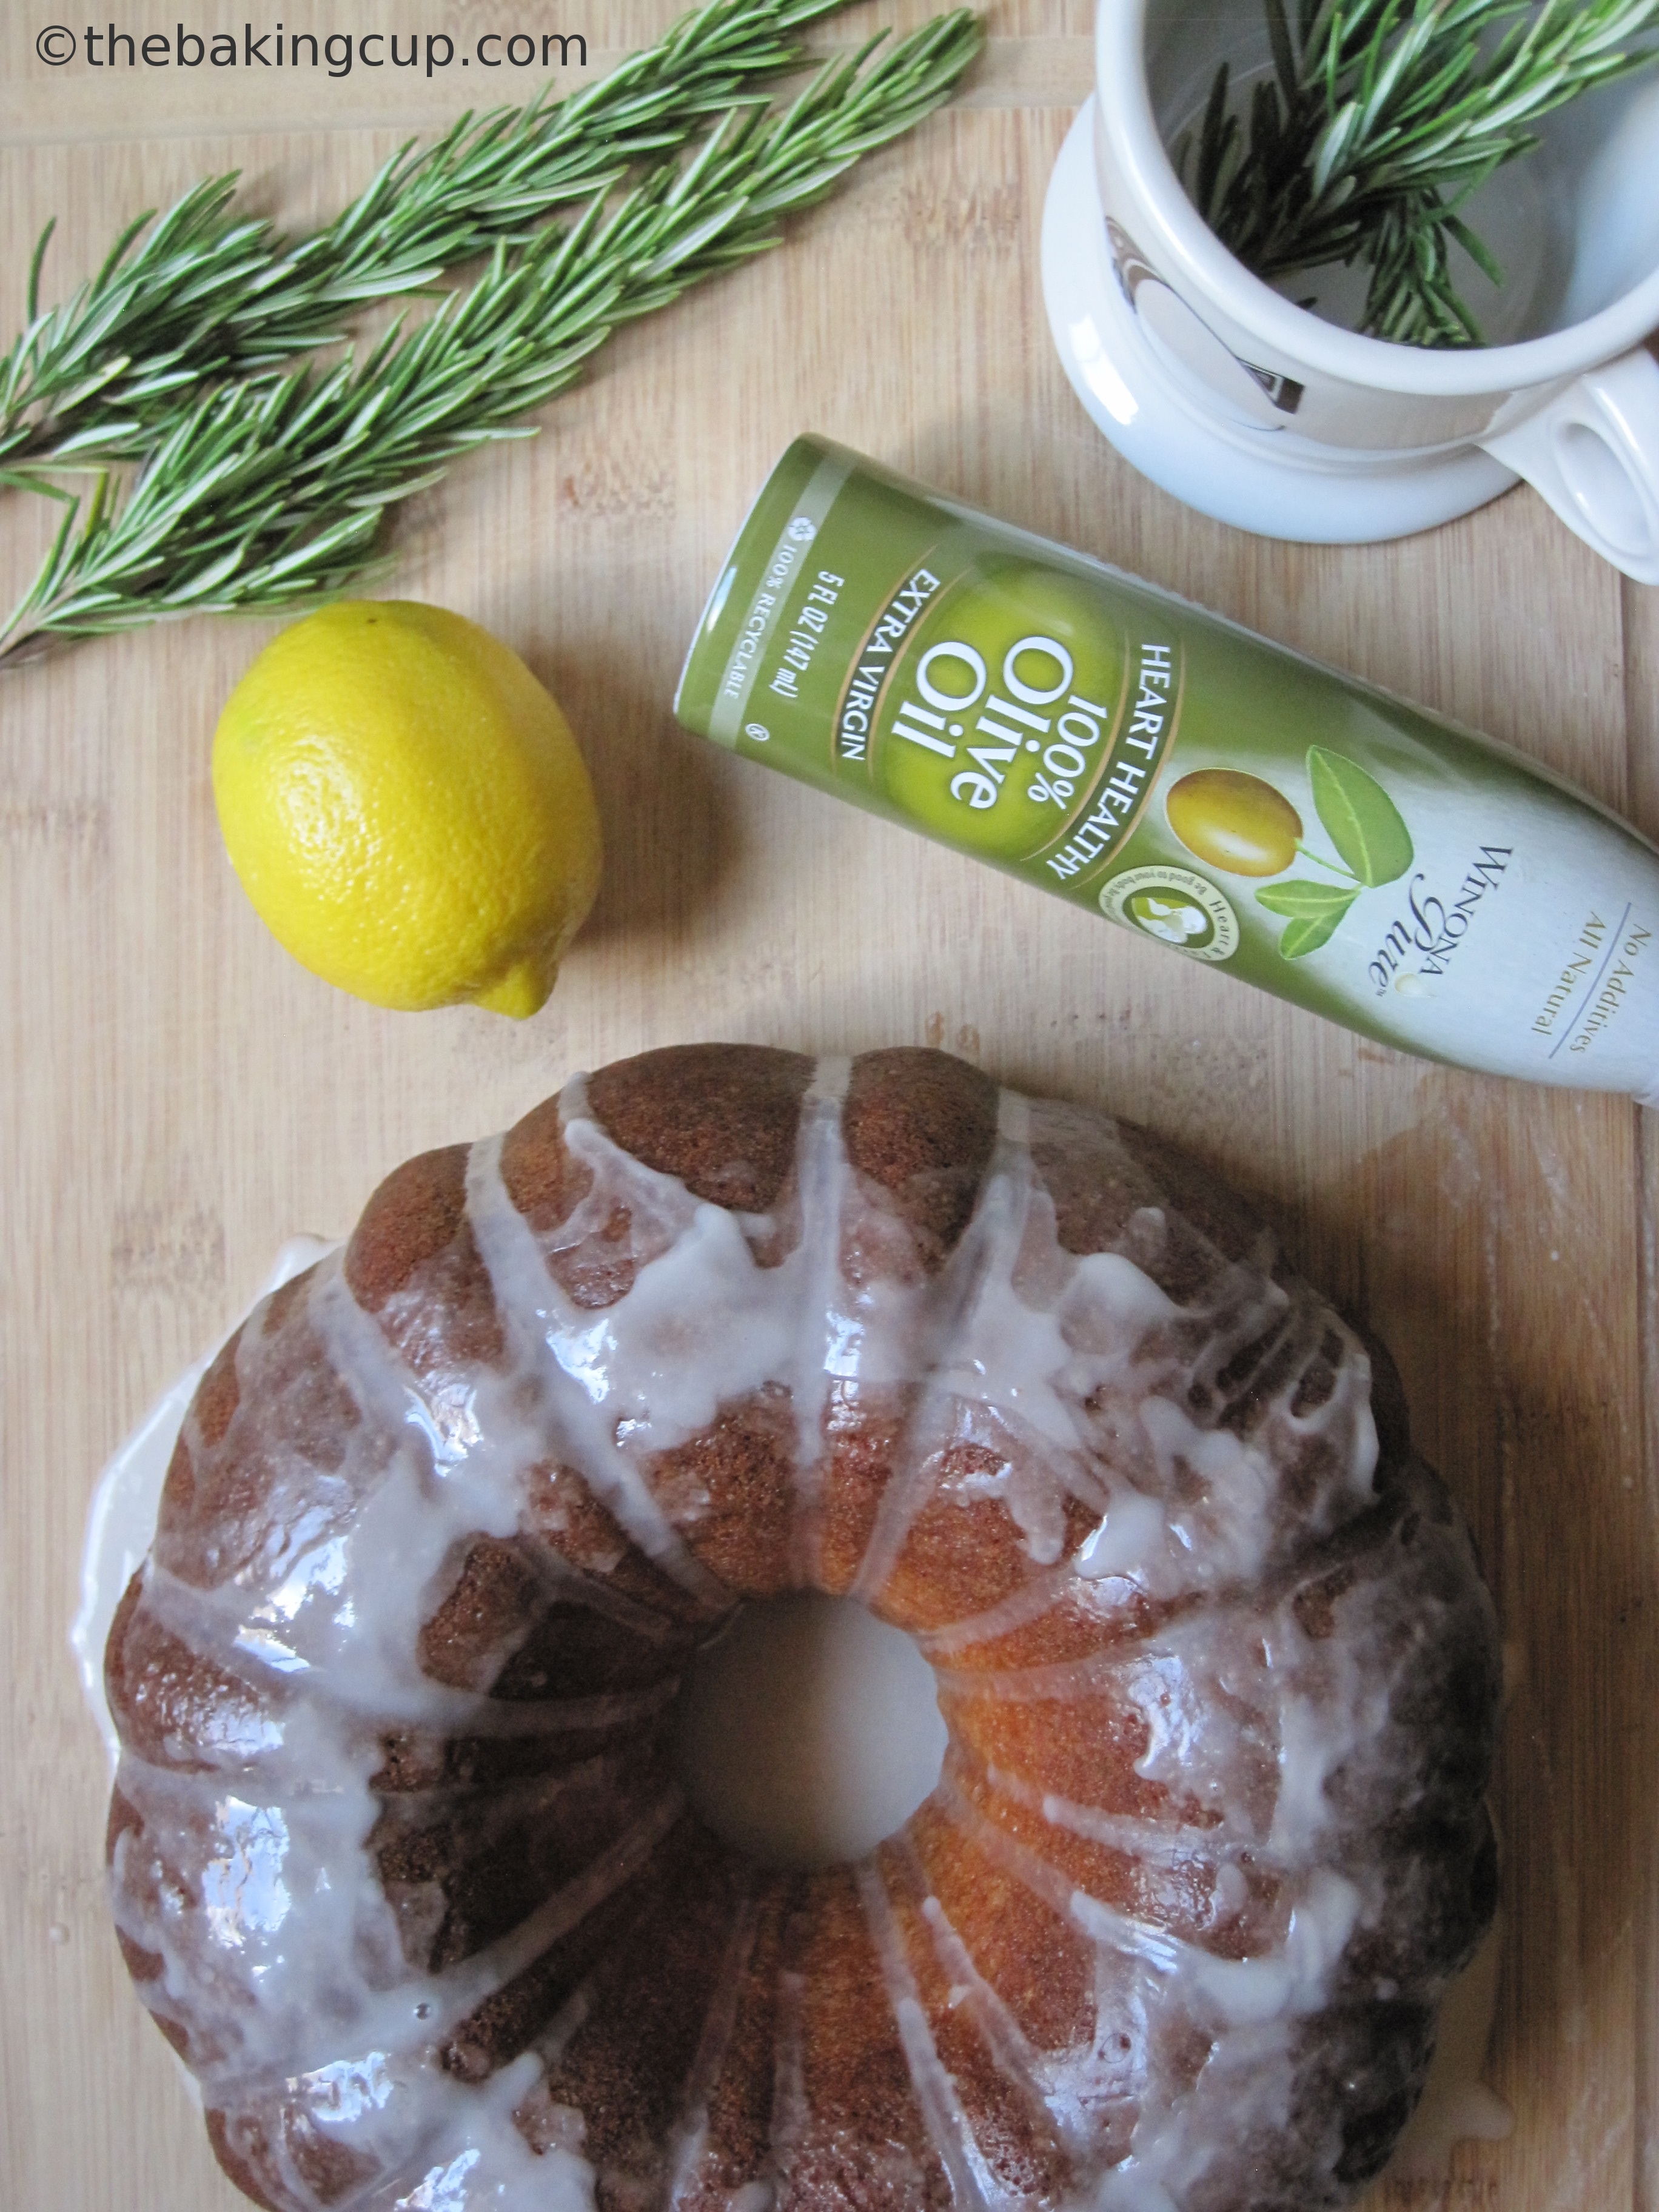
This time I went with an olive oil bundt cake – so rich in flavor and light in texture that you’ll want to eat three pieces in a row. At least it has tons of omega-3s, right?

Enjoy your summer and I promise that when you make this cake, you’ll be in summer heaven and the star among your friends and family.

the baking cup olive oil lemon rosemary bundt cake5

5.0 from 1 reviews
Summery Olive Oil Lemon Rosemary Bundt Cake
 
Ingredients
  • zest of two large lemons
  • 1 tbsp fresh rosemary, finely chopped
  • 2 and ½ cups sugar
  • 3 cups unbleached all purpose flour
  • 2 and ½ teaspoons baking powder
  • ½ teaspoon sea salt
  • One 8 ounce package cream cheese, room temperature {about 1 hour sitting on the kitchen counter}
  • 1 cup olive oil, I used Winona Pure Oils
  • 6 large eggs, room temperature {about 1 hour sitting on the kitchen counter}
  • 2 teaspoons vanilla extract
  • ½ cup whole milk, room temperature {about 1 hour sitting on the kitchen counter}
  • Lemon Glaze:
  • 1 cup powdered sugar
  • juice of 1 lemon
Instructions
  1. in a large bowl mix sugar and lemon zest together with a fork. press fork against sugar and lemon zest to release the oils from the lemon zest. you want to do this until fragrant, about 3 minutes or so.
  2. preheat oven to 350F. butter a bundt cake pan. set aside.
  3. in a large bowl, sift flour and baking powder. add sea salt and mix well.
  4. in a bowl of a stand mixer, beat cream cheese over medium-high speed {speed #6 in a kitchenaid} for 2 minutes until fluffy. stop mixer, add melted butter and sugar mixture and beat until fluffy and creamy over medium-high speed, about 1 and ½ minutes.
  5. reduce speed to medium {speed #5 in a kitchenaid} and add eggs one a at time mixing well after each addition. follow by vanilla extract.
  6. set speed to the lowest setting and alternate flour mixture with milk in three additions. make sure to start and finish with flour. do not over mix.
  7. pour batter into prepared pan smoothing it out with a rubber spatula if needed.
  8. bake for 45-50 minutes or until an inserted knife comes out with a few crumbs.
  9. let it cool in the pan for 20 minutes on a cooling rack.
  10. take cake out of the pan and let it cool completely on the cooling rack. it can take up to one hour.
  11. make the glaze by combining the powdered sugar and lemon juice until thick. pour over the cake.
  12. store at room temperature in an airtight container for up to two days.

Note: if cake browns too fast while baking, cover it with a piece of tin foil or parchment paper so the top doesn’t burn.

Thanks again to Winona Pure Oils for providing their amazing oils. Please note that i was not compensated for this post and all opinions are my own.

© the baking cup’s recipes, content, and images are copyright protected. Please do not republish my recipes and images without prior permission. If you loved this recipe {thanks!} and wish to share it, please rewrite the directions in your own words and provide a link back to give me credit. You can also link back to this post for the recipe without rewriting it. Please read this article on how to properly credit a recipe if you have any questions or are confused :)

the baking cup olive oil rosemary bundt cake6


FacebookTwitterGoogle+

Share This Post

The New York Baking Company Silicone Baking Cups Review!

when Rizzi from The New York Baking Company asked me to review their popular silicone baking cups, I didn’t think it twice and of course said yes!

NY Baking Company - the baking cup product review

It’s truly amazing to have this opportunity and cannot thank Rizzi enough for allowing me to review these baking cups. how fitting that my blog is called ‘the baking cup,’ also!?!

the silicone baking cups are $9.95 for a pack of 12, and are made of BPA free, FDA approved, stain proof silicone. they come in four neon colors: blue, pink, green, and orange.

NY Baking Company - the baking cup product review 3

these baking cups or baking liners work like the disposable ones you see at bakeries or bake at home with, but much better.

why, you ask?

NY Baking Company - the baking cup product review 4

1. well, what i like the most is that they’re reusable: eco-friendly points with me right there.

2. they’re dishwasher safe: thank god because i think doing dishes is overrated. i can see you shaking your head “yes” wide-eyed and concurring with me!

3. the baking cups are made of silicone: which leads to a more uniform shape, and it allows the cupcake or muffin to easily come right out of the baking liner without breaking the cupcake/muffin.

4. cupcakes bake more evenly than using regular cupcake liners: i baked a few cupcakes at the same time using regular paper liners and they came out under baked on the top, while the cupcakes baked in the silicone liners came out moist throughout and completely baked.

5. you don’t need a cupcake pan to use these silicone baking cups: if you’re not a baker, and don’t want to invest in a cupcake pan, but would like to make cupcakes or muffins, just place the baking cups on a cookie/baking sheet. the cupcakes liners will keep their shape and won’t fall over because they’re sturdy enough on their own. however, you can always use a cupcake pan if you have it.

6. cupcakes or muffins will be more moist: i used a classic vanilla cupcake recipe and when i took out the cupcake there were more crumbs on the silicone liner than i thought it’d be. which makes me think the liners retain a lot more moisture than paper cups. the solution is not to let cupcakes cool completely in the baking cups. as soon as the cupcakes are manageable and not too hot, pop them out of the liners so they don’t become soggy or too sticky.

NY Baking Company - the baking cup product review 6

cupcakes were completely cooled in the silicone baking liner leaving more crumbs than i anticipated.

NY Baking Company - the baking cup product review 7

cupcake on the left was baked with a paper liner and the one on the right with the silicone baking cups. the one on the left is a little taller and with a tighter crumb, and a little drier.

these silicone baking cups are a great purchase if you bake occasionally or if you only need a dozen. one of the cons i found is that the packet only has 12 cupcake liners. i wish they would come in packets of at least 24. another downsize is that they only come in neon colors, so it doesn’t leave you too many options. hopefully The New York Baking Company expands the color palette and offers more options soon, like seafoam green, pastel yellow, and teal :)

NY Baking Company - the baking cup product review 5

thanks again to The New York Baking Company for providing these silicone baking cups free of charge. please note that i was not compensated for this post and all opinions are my own.

© the baking cup’s recipes, content, and images are copyright protected. Please do not republish my recipes and images without prior permission. If you loved this recipe {thanks!} and wish to share it, please rewrite the directions in your own words and provide a link back to give me credit. You can also link back to this post for the recipe without rewriting it. Please read this article on how to properly credit a recipe if you have any questions or are confused :)

NY Baking Company - the baking cup product review 2


pastry cream strawberries filled chocolate layer cake

i thought of sharing this cake with you after all the fuss of valentine’s day.

thebakingcup choc cake 1
valentine’s day is a great holiday, but like my husband says, we celebrate LOVE every day, so why not celebrate with chocolate cake every day?!? even though there’re strawberries, pastry cream and chocolate involved, you can make this cake for any occasion, even birthdays.

thebakingcup choc cake 2
this pastry cream is good, especially against the rich, moist chocolate cake.

it’s actually one of a few times of making pastry cream, and i need to make it again and tweak it a little bit. but it’s pretty good with the chocolate ganache filling and fresh strawberries.

thebakingcup choc cake 3

thebakingcup choc cake 5

pastry cream strawberries filled chocolate layer cake

chocolate ganache ingredients
2.5 oz semisweet chocolate
1 oz cup heavy cream

pastry cream (make a day or up to a week in advance)
1 cup milk
1 cup heavy cream
3 tbsps vanilla extract
3/4 cup sugar
5 egg yolks
1 and 1/2 tbsp cornstarch
1 tbsp butter

chocolate cake
2 cups all purpose flour
3/4 cup unsweetened natural cocoa powder
1/2 teaspoon sea salt
1 teaspoon baking powder
1 teaspoon baking soda
2 cups granulated sugar
2 extra large eggs
1 cup buttermilk
½ cup canola oil
2 teaspoons pure vanilla extract
1 cup strong brewed decaf coffee, hot

white chocolate ganache frosting
3.5 oz white chocolate
1 oz heavy cream
2 and 1/2 sticks unsalted butter
1 and 1/2 cups powdered sugar
1/4 tsp sea salt
2 tsps vanilla
1 and 1/2 tbsps milk
4 strawberries, sliced

make the ganache:

  1. chop chocolate as fine as you can and place in a heat-proof bowl.
  2. bring heavy cream to a simmer in a sauce pan over medium heat and it’s ready when it almost starts bubbling. do not boil.
  3. pour cream over chocolate and let sit for 30 seconds to one minute. whisk the two together until well combined, smooth and shiny. let it cool and set aside.

make the pastry cream:

  1. combine milk, heavy cream in a saucepan and bring to a boil over medium heat, stirring continuously with a wooden or heat-proof rubber spatula. Turn off and set aside.
  2. in a medium bowl, whisk together egg yolks, sugar until shiny. add the cornstarch and mix well, carefully not leaving any lumps.
  3. temper the eggs by adding about 1/4 cup of the hot milk/heavy cream mixture.
  4. add the rest of the eggs to the hot milk and cook over medium stirring constantly until thickens, about 2 to 3 minutes. add butter and vanilla extract and mix well. take off heat and set aside for a few minutes.
  5. pour pastry cream through a fine mesh strainer to avoid curdled egg in the final product. cover with plastic wrap pressing against the pastry cream so a film/skin doesn’t form. refrigerate for at least overnight. make a day or up to a week in advance.
  6. this pastry cream yields way more than needed for this cake. half the recipe if you like.

make the chocolate cake:

  1. preheat oven to 350 degrees. butter three 6-inch pans throughout. line the bottoms with parchment paper and butter and flour bottoms and sides.
  2. in a medium bowl sift flour, cocoa powder, salt, baking powder, baking soda and sugar together.
  3. in the bowl of a stand mixer beat egg, buttermilk, oil and vanilla for 1 minute on medium-low speed until combined.
  4. add hot coffee in a steady form to eggs, buttermilk and oil mixture at slow speed until well combined, about 30 seconds.
  5. set speed to the slowest setting and add flour mixture to liquids, 1/2 cup a at time until combined. do not over mix.
  6. divide batter evenly among prepared pans. bake for 30 minutes, or until an inserted toothpick comes out with a few crumbs. start checking at the 25 minute mark with a toothpick.
  7. cool cakes in the pan on a wire rack for at least 20 minutes {or until the pans are cool to the touch} and with a plastic knife separate cake from the edge of the pan and then take cake out of pans by flipping pan onto the cooling rack. let cool completely on the cooling rack before frosting, about 1 hour or more.

make the white chocolate ganache frosting:

  1. warm heavy cream in the microwave for 15 seconds and pour over chopped white chocolate. let it stand for 30 seconds and whisk until combined. set aside to cool.
  2. cream butter for 3 minutes over medium speed {setting #5 on kitchenaid} with the whisk attachment of a stand mixer. once done creaming mix for 30 more seconds at high speed.
  3. stop mixer. add sugar and beat at the lowest speed setting possible for 1 to 2 minutes until combined. while mixing add vanilla and salt.
  4. increase speed to setting #6 or medium high and beat for 3 more minutes until fluffy and creamy.
  5. add cooled ganache and mix well for 30 seconds on medium speed.

to assemble the cake:

  1. place a dollop of frosting in the middle of a plate, cake stand or cake board wrapped in tin foil paper and set first layer bottom side up. the addition of frosting is to prevent the cake slides while working on it.
  2. with a pastry bag fitted with a standard round tip and filled with the buttercream, pipe a dam around the edge of the cake to avoid the pastry cream comes out on the sides.
  3. add half of ganache and spread with an offset spatula, and add 1/4 cup of pastry cream spreading with an offset spatula as well. add half of sliced strawberries.
  4. place the other cake layer bottom side up and pipe a dam, add rest of ganache and another 1/4 cup of pastry cream, and strawberries. continue to assemble the cake until you get to the top layer, which you’ll want bottom side facing up.
  5. crumb coat your cake with a thin layer of the frosting. this layer doesn’t have to be perfect. place cake in the fridge for about 20 to 30 minutes to help it set.
  6. coat cake with the rest of the frosting until smooth.
  7. serve immediately or store in the refrigerator in an airtight container for up to 1 day. make sure to serve at room temperature.
  8. make chocolate heart by melting any type of baking chocolate, pour into a disposable piping bag or “baggie”, cut tip and pipe melted chocolate into a heart shape on a piece of parchment paper. place toothpick in the middle part and cover with a little more chocolate. let it harden in the refrigerator for about 30 minutes.

notes:

  1. double the recipe of each item (except the pastry cream) for a three layer 8-inch cake.
  2. you can make the cake the night before but make sure to wrap tightly in plastic paper after they’ve cooled down and store at room temperature or freeze up to 3 days.
  3. you can make the ganache the day before or even a week in advance by storing it in the refrigerator in an airtight container after it’s no longer hot. let the ganache come to room temperature before using or until spreadable consistency. you can microwave for 10 seconds to make it smooth.
  4. make the white chocolate ganache buttercream a day or even a week in advance by storing it in the refrigerator in an airtight container and letting it come to room temperature for at least 5 hours. whisk frosting by hand or mixer at low speed until smooth.

pastry cream adapted from country cleaver.

© the baking cup’s recipes, content, and images are copyright protected. Please do not republish my recipes and images without prior permission. If you loved this recipe {thanks!} and wish to share it, please rewrite the directions in your own words and provide a link back to give me credit. You can also link back to this post for the recipe without rewriting it. Please read this article on how to properly credit a recipe if you have any questions or are confused :)

thebakingcup choc cake 4

4th of july cupcakes with an amazing giveaway

what a great post i have for you!!! a little long but worth the time because it includes cupcakes and an awesome giveaway.

Betsy from Java Cupcake and Carrie from Bella Cupcake Couture are the organizers of this cupcake blog party, and includes 23 other bloggers with different cupcake recipes. pretty much 2 recipes a month for you to bake for an entire year!

the assignment: to display simple and delicious cupcakes in bella cupcake couture cupcake wrappers with props laying around the house to show you how to create a good looking cupcake table with little effort.

the theme for the cupcake blog party? 4th of july, of course. which i think is a perfect fit since the holiday is almost upon us. it came by really fast, didn’t it?

4th of july vanilla cupcakes by the baking cup

4th of july vanilla cupcakes by the baking cup
if you have a get together planned for 4th of july, you need must get these cupcake wrappers {or enter for your chance to win it} and display your cupcakes effortlessly because these {cute wrappers} basically do the job for you. and that’s one less thing you have to do.

isn’t that nice?

4th of july vanilla cupcakes by the baking cup
and if you don’t have a party, it’s time you start planning one. you still got a week or so to go!

4th of july vanilla cupcakes by the baking cup
let me tell you about the props. they look kind of fancy but in reality they are far from it. well, some do have sentimental value, which is nice but i promise they aren’t fancy at all.

the backdrop are napkins my husband’s late grandma gifted us at our wedding shower. the cake stand i had it before we got married and actually used it at our wedding.

4th of july vanilla cupcakes by the baking cup
the stars are made from paper i downloaded from martha stewart’s website for free. i got the stars template from the internet for free as well. just google “free star template” and you’ll find tons.

and i taped some of the paper stars to toothpicks to create the cupcake toppers.

4th of july vanilla cupcakes by the baking cup

4th of july vanilla cupcakes by the baking cup

cupcake wrappers + cupcake toppers = good looking cupcakes!

4th of july vanilla cupcakes by the baking cup
the ribbon/star backdrop was pretty easy. scotch taped the ribbon to the napkins and glued the paper stars to the ribbon. i also had red ribbon laying around so i cut it in 1-inch pieces for a “festive” 4th of july confetti.

IMG_0172

4th of july vanilla cupcakes by the baking cup
see? something you can easily accomplish for any party, actually. they look great and there was no hard work involved at all!

4th of july vanilla cupcakes by the baking cup     4th of july vanilla cupcakes by the baking cup
happy birthday america!

4th of july vanilla cupcakes by the baking cup

below are the details on how to enter the giveaway.

and here’s a recipe for my favorite vanilla cupcakes with vanilla buttercream frosting.

vanilla cupcakes ingredients:
1 and 1/8 cups cake flour
1 and 1/4 teaspoons baking powder
1/2 teaspoon sea salt
6 tablespoons unsalted butter, room temperature {still cold to the touch; sitting on kitchen counter for 30 to 50 minutes}
3/4 cup white granulated sugar
3 large eggs, room temperature {sitting on kitchen counter for 30 to 50 minutes}
1 tablespoon vanilla extract
1/2 cup whole milk, room temperature {sitting on kitchen counter for 30 to 50 minutes}

yields 10 cupcakes

4th of July vanilla buttercream ingredients
2 sticks unsalted butter {still cold to the touch; sitting on kitchen counter for 30 to 50 minutes}
1 and 1/2 cups powdered sugar
1/4 teaspoon sea salt
1 teaspoon vanilla extract
1/4 teaspoon blue gel paste food coloring

yields a generous amount for 10 cupcakes

directions:

  1. preheat oven to 350F. line one standard cupcake pan with paper liners {10 cups in total} and set aside. in a medium bowl, sift cake flour with baking powder and salt. mix with a whisk and set aside.
  2. cream butter in the bowl of a stand mixer fitted with the paddle attachment for 1 minute over medium speed {kitchenaid setting #5}.
  3. add sugar to butter and cream together for 3 minutes over medium speed until fluffy.
  4. set speed to medium low {kitchenaid setting #4} and add eggs one at a time and mixing 20 seconds in between to incorporate well. add vanilla and mix for 30 more seconds.
  5. stop mixer to scrape the sides and bottom of the bowl and paddle attachment and mix on high for 30 seconds to mix all ingredients well. if batter curdles beat for 30 seconds more.
  6. set speed to the lowest setting and alternate flour mixture with milk in three additions. do not over mix.
  7. scoop batter into cups with an ice cream scoop filling them 3/4 full.
  8. bake for 18 minutes or until an inserted toothpick comes out clean, rotating cupcakes half way through. let them cool in the pan on a wire rack for 2 minutes and out of the pan for about 30 minute on the same wire rack.
  9. make the frosting: cream butter for 3 minutes over medium speed {setting #5 on kitchenaid} with the whisk attachment of a stand mixer. once done creaming mix for 30 more seconds at high speed.
    stop mixer. add sugar and beat at the lowest speed setting possible for 1 to 2 minutes until combined. while mixing add vanilla, salt, milk and gel paste food coloring. increase speed to setting #6 or medium high and beat for 3 more minutes until fluffy and creamy. frost cupcakes with round tip or with an offset spatula.
  10. store cupcakes in an airtight container at room temperature for up to 3 days.

now we talk giveaway! the participating bloggers and their recipes include:

Sprinkles will Fly FINAL

A Pumpkin & A Princess      An American Cupcake in London      Bella Cupcake Couture

Chronicles of a Foodie      Creative Food      Cupcakes Take the Cake

Diary of a Mad Hausfrau      Haniela’s      Healthful Pursuit      Hoosier Homemade

Hungry Happenings      In Katrina’s Kitchen      Inside BruCrew Life

Java Cupcake      Kitchen Fun with My 3 Sons      Love From the Oven      Make Bake Celebrate

Not Just a Mommy      Not Your Mommas Cookie      Pint Sized Baker

Sugar Swings! Serve Some      The Baking Cup      Cupcake Project      The Decorated Cookie

and let’s not forget the cool prizes!

Prize Pack

thanks to our amazing Prize Pack sponsors for their generous donations! please, visit their websites to see more of their fabulous products!

Bella Cupcake Couture

The Smart Baker

India Tree

Lucks Food Decorating Company

Pretty Party Details

to enter to WIN this Prize Pack, simply fill out the entry form by clicking here. you have to like my facebook page, leave me a comment below and fill out the form in order to be entered for a chance to win.

contest opens 25 June 2013 at 07:00 PST and closes 1 Jul 2013 at 23:59 PST. one winner will be chosen and announced within 48 hours of the contest ending. winner will be contacted via email by betsy@javacupcake.com and will have 48 hours to claim their prize. if they do not respond within 48 hours, another winner will be chosen.

this contest is open to residents worldwide.

4th of july vanilla cupcakes by the baking cup

exquisite brown butter oatmeal cookies

brown butter oatmeal cookies is where’s at! i don’t think i liked a cookie so much besides my chewy chocolate chip or nutella s’mores cookies

these oatmeal cookies absolutely take the cake :)

let’s talk about the key ingredient: brown butter.

brown butter makes this cookie chewy, chewy, chewy and so delicious. brown butter has a nutty flavor and enhances anything you put it in/on. this recipe also has a pinch of cinnamon, which goes amazingly well with the oatmeal and brown butter. hope you are making them right now as you read this!

enjoy the how-to pics below and how exquisite they look after you bake them!

make the brown butter by melting the butter over medium heat until it foams and changes to an amber color.

IMG_0080

make sure to whisk, whisk, whisk!

IMG_0081
if you follow me on instagram or facebook, you probably saw this picture of the state of ohio making an appearance in the brown butter, hahaha :)

IMG_0082

here’s the brown butter cooling down. see how the color changed?

IMG_0084
in a food processor, grind oats.

IMG_0074

and sift it through a mesh colander.

IMG_0075

add brown sugar and brown butter.

IMG_0077

IMG_0085

ready to go!

IMG_0087

IMG_0090
cooooookieeeesssss!

exquisite brown butter oatmeal cookies by the baking cup

exquisite brown butter oatmeal cookies by the baking cup

exquisite brown butter oatmeal cookies by the baking cup

exquisite brown butter oatmeal cookies

ingredients:
1 cup unbleached all purpose flour
1/4 cup cake flour
1 cup old fashion oats, divided
1/2 teaspoon cornstarch
1/2 teaspoon baking soda
1/2 teaspoon sea salt
1/4 teaspoon ground cinnamon
1/4 cup white granulated sugar
1/2 cup dark brown sugar, tightly packed
1 stick unsalted butter, sliced in 1 tablespoons
1 large egg, room temperature {sitting on the kitchen counter for 30 to 50 minutes approximately}
2 teaspoons pure vanilla extract

yields 9 to 10 medium cookies.

directions:

  1. make brown butter: in a saucepan melt butter over medium heat. whisk constantly until the butter has changed to an amber color {about 5 to 8 minutes}. you will smell it once it’s done. remove saucepan from heat and pour butter in a bowl to cool down. set aside.
  2. preheat oven to 375F. line two cookie sheets with parchment paper or silpat and set aside.
  3. in a large bowl, combine flours, salt, baking soda, cornstarch, cinnamon and 1/2 cup of the oats. whisk well and set aside.
  4. in a food processor grind the remainder 1/2 cup of the oats until crumb is very fine. sift through a mesh strainer. grind the remainder oats on the strainer in the food processor again. add crumbs to bowl.
  5. whisk in sugars and mix well with the flour/oats mixture.
  6. add cooled brown butter and egg to the bowl and mix with a wooden spoon or rubber spatula until combined. mix in vanilla.
  7. with a regular size ice cream scoop, fill it 3/4 full, and form cookie dough balls. if you fill the scoop all the way, cookies will be way too big. continue to do this step until dough is all gone.
  8. bake cookies for 10 minutes rotating them half way through. do not over bake. they will look pale and gooey, but once they are cooled off they are the perfect consistency.
  9. let cookies cool in the cookie sheet placed on a cooling rack for about 5 minutes or so and then transfer cookies to a cooling rack.
  10. store at room temperature in an airtight container for up to 3 days.

note: you can refrigerate dough for about 10 minutes if the dough is too soft. i did refrigerate the dough so they cookies were a little thicker, but if you like flat cookies, you don’t have to refrigerate the dough at all.

exquisite brown butter oatmeal cookies by the baking cup